
Effortless and Delicious: How to Make Oatmeal Bread Dough in Your Bread Machine.
Imagine sinking your teeth into a freshly baked loaf of warm oatmeal bread – the perfect combination of hearty and wholesome.
And the best part? You can make it yourself right at home using a simple bread machine. In this article, we will show you how to make this oatmeal bread dough in a bread machine – no kneading here!
From the basic ingredients and equipment needed, to the detailed instructions and helpful tips, get ready to learn how to effortlessly make this hearty bread. Let’s get started!
WHAT EQUIPMENT DO I NEED?
- bread machine – mine is old and discontinued, but this is one that is similar and the same brand.
- measuring cups & spoons
- 2 bread pans (9x5in.)
- towel
- oven
- oven mitts
- cooling rack
SIMPLE INGREDIENTS FOR OATMEAL BREAD MACHINE RECIPE
This bread machine oatmeal bread recipe makes 2 – 1 lb. loaves. If you don’t need both right away, consider giving it away to a friend, neighbor, or elderly person that could enjoy it. You can also freeze the loaf of bread (see directions below).
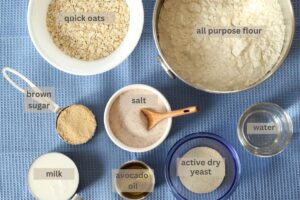
For the complete list of ingredients and measurements, see the recipe card.
Jump to RecipeINSTRUCTIONS
Always put ingredients in order of the manufacturer’s instructions for your specific bread machine. The order I have listed here is according to mine which instructs any liquid ingredients first, followed by any dry ingredients.
***Tip: If you live above sea level, please refer to this article for guidance on adjusting the recipe.
BREAD MACHINE INSTRUCTIONS:
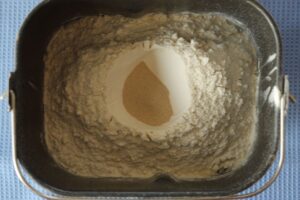
Step One: Add any wet ingredients to the bottom of your bread machine pan followed by the salt and sugar.
Step Two: Add remaining dry ingredients beginning with the quick oats first, followed by the flour. (Begin with 3 3/4 cups of flour and then slowly add remaining flour as dough cycle begins, if needed).
Step Three: In the top of the flour, make an indent (or sometimes called a yeast crater) and put active dry yeast in the crater.
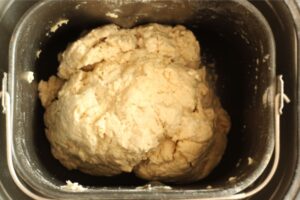
Step Four: Set bread maker on dough cycle and press start. Watch to make sure dough comes together into a ball. Add a little more flour if dough is too sticky or a little more water if it’s too dry.
***Tip: Dough ball should appear somewhat smooth and should not stick to the edges of your bread machine pan.
PREPARING BREAD LOAVES TO BAKE:
Once bread maker dough cycle is complete, follow these steps:
Grease loaf pans. Spray each loaf pan with cooking spray. Set aside.
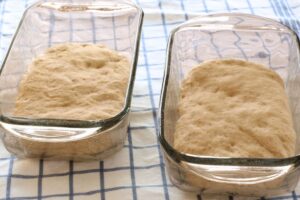
Form loaves and let rise. Remove dough from bread machine pan and form bread loaf by tucking the edges beneath the loaf and pinching the seams together. Place formed loaf in each greased bread pan with seam sides down. Cover with a towel and let rise until close to double in size (usually takes 30 – 60 minutes depending on the temperature of your home).
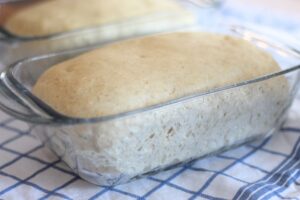
**Tip: You can speed up your rise time if you have an electric heat pad! I set my heat pad on our dining room table and put the loaf pans on top to rise. Works great!
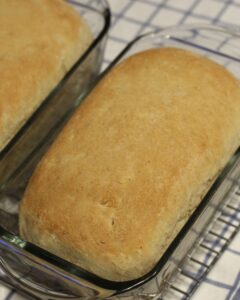
Preheat oven and bake. When loaves are close to done rising, preheat oven to 350 degrees Fahrenheit. Put loaves into preheated oven and bake for 25 – 30 minutes until the crust color of the loaves are golden brown. You will know when they’re done if you gently tap the top and it sounds hollow.
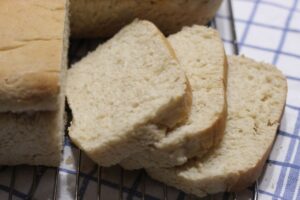
Cool. Let baked bread cool in pan for 10 minutes. If necessary, carefully loosen edges of bread from sides of pan with a butter knife. Dump bread out on to a cooling rack. Flip bread so it is upright. (Be careful. If pan is still too hot to touch – use oven mitts.)
*** Tip: Make sure you let your homemade bread cool completely before slicing with a serrated knife.
Enjoy!
HOW TO ENJOY
This is the best bread for toast to go along with a breakfast egg bake. Serve with butter and your favorite jam.
Also, it’s a delicious bread served with any sort of spaghetti or lasagna type dish.
STORING LEFTOVERS
Let the bread cool completely to room temperature before storing it in either an airtight container or plastic bag. It should be kept out of direct sunlight. Best if enjoyed within 2 – 3 days of baking.
To freeze: room temperature oatmeal bread can be wrapped tightly in plastic wrap and placed in a freezer Ziploc style bag. Best if used within 2 months of date frozen.
If you have any questions, let me know in the comments below.
Blessings,

BEST OATMEAL BREAD DOUGH MADE IN BREAD MACHINE
Ingredients
- 3/4 cup warm water not hot
- 3/4 cup milk substitute almond milk if dairy free
- 2 tbsp. avocado oil
- 1 1/2 tsp. salt
- 1/4 cup brown sugar
- 2/3 cup quick oats or instant oats
- 3 3/4 to 4 cup all purpose flour
- 2 tsp. active dry yeast
- cooking spray
Instructions
BREAD MACHINE INSTRUCTIONS:
- Add any wet ingredients to the bottom of your bread machine pan followed by the salt and sugar.
- Add remaining dry ingredients starting with the quick oats first, then the flour. (Begin with 3 3/4 cups of flour and then slowly add remaining flour as dough cycle begins, if needed).
- In the top of the flour, make an indent (or sometimes call yeast crater) and put active dry yeast in the crater.
- Set bread maker on dough cycle and press start. Watch to make sure dough comes together into a ball. Add a little more flour if dough is too sticky or a little more water if it's too dry.***Tip: Dough ball should appear somewhat smooth and should not stick to the edges of your bread machine pan.
PREPARING BREAD LOAVES TO BAKE:
- Once bread maker dough cycle is complete, follow these steps.
- Grease loaf pans. Spray each loaf pan with cooking spray. Set aside.
- Form loaves and let rise. Remove dough from bread machine pan and form bread loaf by tucking the edges beneath the loaf and pinching the seams together. Place formed loaf in each greased baking pan with seam sides down. Cover with a towel and let it rise until close to double in size (usually takes 30 – 60 minutes depending on the temperature of your home).
- Preheat oven and bake. When loaves are close to done rising, preheat oven to 350 degrees Fahrenheit. Put loaves into preheated oven and bake for 25 – 30 minutes until loaves are golden brown. You will know when they're done if you gently tap the top and it sounds hollow.
- Cool. Let baked bread cool in pan for 10 minutes. If necessary, carefully loosen edges of bread from sides of pan with a butter knife. Dump bread out on to a cooling rack. Flip bread so it is upright. (Be careful. If pan is still too hot to touch – use oven mitts.)*** Tip: Make sure you let your homemade bread cool completely before slicing with a serrated knife.
- Enjoy!
Leave a Reply